
简单介绍我的工作,地图推断,地图更新
计算机视觉构建地图任务
数据收集:收集包含所需地理信息的图像或视频数据。这些数据可以是通过卫星、飞机或地面摄像机采集的。
图像处理:对收集到的图像或视频进行处理,包括去除噪音、调整图像质量、进行几何校正等,以提高后续地图构建的准确性。
特征提取:利用计算机视觉技术,从图像中提取地理信息的特征,例如建筑物、道路、水体等。这可能涉及目标检测、语义分割等技术。
地图构建:根据提取到的地理信息特征,构建地图模型。这可以是根据图像中的像素位置将特征映射到地理坐标上,或者使用几何信息构建三维地图模型。
地图整合与验证:将不同来源的地图数据整合在一起,并对生成的地图进行验证和校准,以确保地图的准确性和一致性。
输出地图:生成各种格式的地图文件,以便于在导航应用程序、地理信息系统(GIS)中使用,或者直接打印成纸质地图。
这些步骤需要结合使用计算机视觉、图像处理、地图学和机器学习等技术,并且需要考虑数据的质量、处理算法的效率以及地图的准确性和实用性。
使用计算机视觉完成地图更新任务
数据采集:利用各种传感器和数据源,如卫星图像、无人机航拍图像、地面摄像头等,采集目标区域的最新图像数据。
图像处理:对采集到的图像数据进行预处理,包括去除噪音、图像增强、几何校正等,以提高后续处理的准确性和效率。
特征提取:利用计算机视觉技术,从图像中提取地理信息的特征,例如建筑物、道路、绿地等。这可能涉及目标检测、语义分割等技术。
地图更新:根据提取到的地理信息特征,更新现有地图数据。这包括添加新的建筑物、更新道路网络、标记新的地标等。
地图验证与校准:对更新后的地图数据进行验证和校准,确保更新的地图与实际情况相符合,并且与现有地图数据保持一致性。
输出更新地图:生成更新后的地图文件,以各种格式提供给用户使用,例如在导航应用程序、地理信息系统(GIS)中更新地图数据。
这些步骤需要结合使用计算机视觉、图像处理、地图学和机器学习等技术,并且需要考虑数据的质量、处理算法的效率以及地图的准确性和实用性。
A data-driven personal website
Like many other Jekyll-based GitHub Pages templates, academicpages makes you separate the website’s content from its form. The content & metadata of your website are in structured markdown files, while various other files constitute the theme, specifying how to transform that content & metadata into HTML pages. You keep these various markdown (.md), YAML (.yml), HTML, and CSS files in a public GitHub repository. Each time you commit and push an update to the repository, the GitHub pages service creates static HTML pages based on these files, which are hosted on GitHub’s servers free of charge.
Many of the features of dynamic content management systems (like Wordpress) can be achieved in this fashion, using a fraction of the computational resources and with far less vulnerability to hacking and DDoSing. You can also modify the theme to your heart’s content without touching the content of your site. If you get to a point where you’ve broken something in Jekyll/HTML/CSS beyond repair, your markdown files describing your talks, publications, etc. are safe. You can rollback the changes or even delete the repository and start over – just be sure to save the markdown files! Finally, you can also write scripts that process the structured data on the site, such as this one that analyzes metadata in pages about talks to display a map of every location you’ve given a talk.
Getting started
- Register a GitHub account if you don’t have one and confirm your e-mail (required!)
- Fork this repository by clicking the “fork” button in the top right.
- Go to the repository’s settings (rightmost item in the tabs that start with “Code”, should be below “Unwatch”). Rename the repository “[your GitHub username].github.io”, which will also be your website’s URL.
- Set site-wide configuration and create content & metadata (see below – also see this set of diffs showing what files were changed to set up an example site for a user with the username “getorg-testacct”)
- Upload any files (like PDFs, .zip files, etc.) to the files/ directory. They will appear at https://[your GitHub username].github.io/files/example.pdf.
- Check status by going to the repository settings, in the “GitHub pages” section
Site-wide configuration
The main configuration file for the site is in the base directory in _config.yml, which defines the content in the sidebars and other site-wide features. You will need to replace the default variables with ones about yourself and your site’s github repository. The configuration file for the top menu is in _data/navigation.yml. For example, if you don’t have a portfolio or blog posts, you can remove those items from that navigation.yml file to remove them from the header.
Create content & metadata
For site content, there is one markdown file for each type of content, which are stored in directories like _publications, _talks, _posts, _teaching, or _pages. For example, each talk is a markdown file in the _talks directory. At the top of each markdown file is structured data in YAML about the talk, which the theme will parse to do lots of cool stuff. The same structured data about a talk is used to generate the list of talks on the Talks page, each individual page for specific talks, the talks section for the CV page, and the map of places you’ve given a talk (if you run this python file or Jupyter notebook, which creates the HTML for the map based on the contents of the _talks directory).
Markdown generator
I have also created a set of Jupyter notebooks that converts a CSV containing structured data about talks or presentations into individual markdown files that will be properly formatted for the academicpages template. The sample CSVs in that directory are the ones I used to create my own personal website at stuartgeiger.com. My usual workflow is that I keep a spreadsheet of my publications and talks, then run the code in these notebooks to generate the markdown files, then commit and push them to the GitHub repository.
How to edit your site’s GitHub repository
Many people use a git client to create files on their local computer and then push them to GitHub’s servers. If you are not familiar with git, you can directly edit these configuration and markdown files directly in the github.com interface. Navigate to a file (like this one and click the pencil icon in the top right of the content preview (to the right of the “Raw | Blame | History” buttons). You can delete a file by clicking the trashcan icon to the right of the pencil icon. You can also create new files or upload files by navigating to a directory and clicking the “Create new file” or “Upload files” buttons.
Example: editing a markdown file for a talk 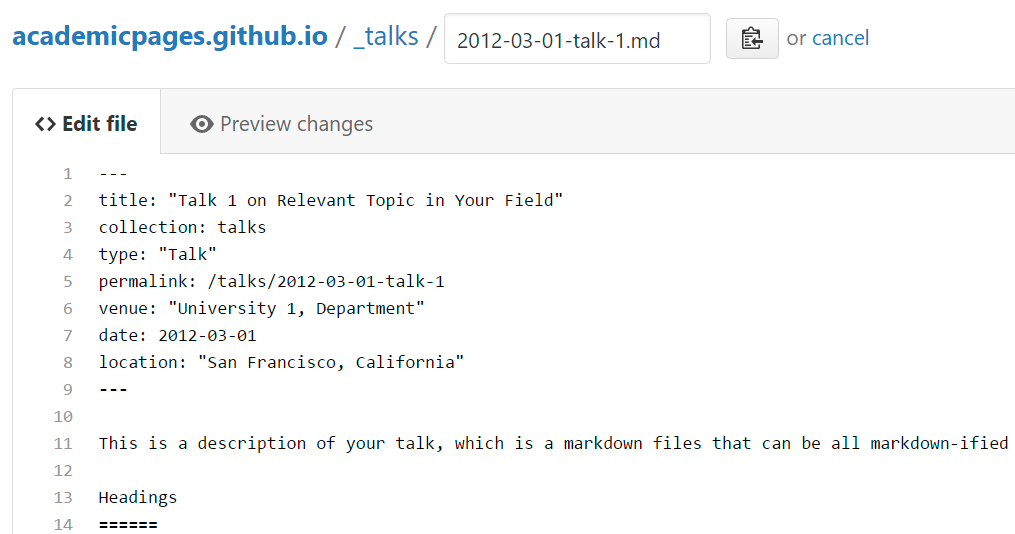
For more info
More info about configuring academicpages can be found in the guide. The guides for the Minimal Mistakes theme (which this theme was forked from) might also be helpful.